
6 card ideas using the free Delicate Dahlias Sale-A-Bration stamp set
Hello, let me introduce you to the beautiful Delicate Dahlia stamp set I got free from the Stampin’ Up! Sale-A-Bration promotion. This stamp set is my favourite from the offering of 11 free exclusive items.
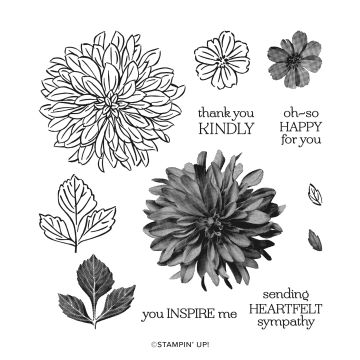
This stamp set is versatile. You get a large line art Dahlia flower with another medium-sized flower, a leaf cluster, and a teeny tiny leaf stamp. Then you get all those stamps again but in a Distinktive* style stamp for a total of 12 stamps in the set. You can fill in the line art stamp with the Distinktive stamp (which is then called Two-Step Stampin’) or use them on their own. That’s three different looks with this set. The fonts used in the sentiments are really nice too. They are easy to read and not too thin in the stroke weight that you can heat emboss them. To me, that’s what makes a great stamp set – great images, nice fonts, and options with the Two-Step Stampin’ feature.
If you are new to Stampin’ Up! And all this lingo has you saying, “What in the heck is she saying!” then you are going to appreciate all the cards I made using this new-to-you lingo. I’ll explain everything 
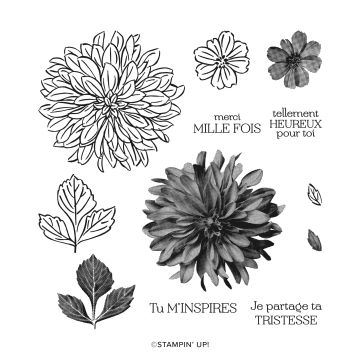
Another thing to note before I dive into card ideas is that most Stampin’ Up! stamp sets that have sentiments are available in French.
*Stampin’ Up!’s patent-pending Distinktive stamps start with a photograph. Then it is turned into a photo-realistic red rubber or photopolymer stamp. This innovative stamp style allows you to create images with depth and detail by simply inking and stamping once.
Delicate Dahlias Thank You Kindly card using In-Colors

I’m going to start with the card I like the most. I used only two ink colours which were the new In-Colors called Pale Papaya and Soft Succulent. This card is light, bright, and easy on the eyes.
I started by drawing a horizontal pencil line through the center of a 5-¼” wide by 4” high piece of basic white cardstock. This will be the card panel that I build on. Using the line art leaf cluster stamp and Soft Succulent ink, I stamped the leaves, turned the stamp, and stamped again until I finished the row. I added a few of the teeny tiny leaves and I love how it gives everything some movement. To fill in the leaves with a colour I lightly touched my Water Painter into some ink and quickly coloured in the leaves. I wanted the colour to be subtle, so a quick brush of the ink is all that was needed. To give the card panel that textured look, I embossed it with the Tasteful Textile 3D embossing folder.
The large line art Dahlia flower was stamped with Pale Papaya on basic white cardstock and this time I softly dabbed my Blender Pen into some ink and flicked lines of colour from the center out. This doesn’t take very long and that little bit of colour adds so much more depth to the petals and helps the flower stand out. I “fussy cut” or aka “detail cut” the flower out.
Before adhering the flower to the card, I wrapped some Pale Papaya ½” woven ribbon around the card panel and stamped the Thank you so kindly sentiment in Soft Succulent and die cut out the two tags with the Tailor Made Tag Dies. I added a couple of dimensionals to pop up the flower and give some room to tuck the layered tags underneath. I used multipurpose glue for that so that I have a few seconds to place it how I like before it dries. I added a few Pale Papaya Genial Gems and glued it to a card base.
Delicate Dahlias Sending Heartfelt Sympathy card featuring Night of Navy

The inspiration for this card and the next card came from Lisa Freemen’s Pinterest Board. She designed a Delicate Dahlia card using Night of Navy and Sahara Sand inks. I really like how the Night of Navy stood out but I choose to use Gray Granite for my contrasting colour instead of Sahara Sand.
Just like the Thank You Kindly card using In-Colors, I embossed a 4” wide by 5-¼” tall card panel with the Tasteful Textile 3D embossing folder. The strip of Night of Navy cardstock is 1.5” wide and 5-¼” tall. I stamped on the panel with the large Distinktive style Dahlia stamp and Night of Navy ink. I wrapped some Night of Navy twine around the strip for some interest and texture.
I stamped the large line art Dahlia on Night of Navy cardstock and used the Blender Pen and flicking motion to colour the petals a bit and to give the flower some depth. I did the same thing with the large leaf cluster but used Evening Evergreen (also a new In-Color) ink and fussy cut them out.
I stamped the Sending Heartfelt Sympathy sentiment with Night of Navy on Gray Granite cardstock and die cut it out with one of the Tasteful Labels dies.
I glued everything down flat but used dimensionals on the sentiment label and Dahlia flower cut out.
Two-Step Stampin’ with Delicate Dahlias

I really worked that Distinktive Dahlia stamp on this card! With Gray Granite ink I randomly stamped the large Distinktive style Dahlia all over a 4” wide by 5-¼” tall card panel. On Gray Granite cardstock I stamped the large line art Dahlia in Night of Navy and then stamped the large Distinktive Dahlia stamp on top of it in Night of Navy ink. The stamps lined up beautifully!
I used the Distinktive leaf cluster stamp to stamp Evening Evergreen ink on Evening Evergreen cardstock. After fussy cutting the Dahlia and two leaf clusters, I stamped the sentiment on Gray Granite cardstock and die cut it out with one of the Tasteful Labels dies.
A blue strip of paper (that was leftover from the card before) was used to ground the elements. I also decided to wrap some ¼” Gray Granite shimmer ribbon around it before adhering it down.
I used dimensionals to stick down the sentiment label and cut out the Dahlia flower followed by glueing the entire panel down to a Gray Granite cardstock base.
Distinktive Delicate Dahlias with Soft Succulent

This card came together pretty quickly. Nothing fancy going on here, just a few layers of cardstock to frame elements.
For this card panel, I started with a 4” wide by 5-¼” tall piece of Basic Black cardstock. I cut a 3-¾” wide by 5” tall piece of Beautifully Penned Designer Series Paper (DSP), which is another free Sale-A-Bration item, and glued them together. I wrapped and tied a bow with the Soft Succulent ⅜” Open Weave Ribbon and made sure the bow was off to the left side enough that it wouldn’t block the front panel. At this point, I glued down the finished panel to a Soft Succulent card base.
For the front panel, I cut a piece of Basic Black cardstock to 2-¾” wide by 3-¼” tall. Using the Distinktive Dahlia stamp in Soft Succulent ink, I stamped off the top left corner of a 2-½” wide x 3” tall piece of basic white cardstock.
After adding dimensionals behind the top panel, I stuck it down and added a few Genial Gems embellishments in the Soft Succulent colour. You can’t see it in the pictures but the Genial Gems have bits of gold in them that give off some sparkle when tilted.
Delicate Dahlias Thank You Kindly emboss and shimmer cards

Now for the happy shimmery cards! These cards happened because I had just finished making my Case the Catty card when trying to get the creative juices flowing. The back panel design is essentially the same as the Case the Catty card but I stamped over the entire piece of cardstock. I also just got these two “new to me” ink colours – Highland Heather and Balmy Blue and I wanted to play with them.
I heat embossed with white embossing powder after I stamped all the line art stamps in the set with Versamark. After I add the white embossing powder I heat it with a heat gun and it melts on the card giving the lines a glossy finish and raised texture. Because the white is glossy, the ink will no longer stick to it. This is where I used a sponge dauber and dabbed it lightly into my juicy new ink pads and swirled it around in the center of the Dahlias. The ink blends into the cardstock underneath giving dimension to the images.
I also recently acquired the Frost White shimmer paint/ink. I added a few drops of it to a Mini Mister and sprayed the panel. It dries pretty quickly and becomes the perfect pearlesque shimmer. From there I wrapped some white twine around the panel three times and taped it down on the backside.
The Thank You Kindly sentiment was stamped in each card’s respective colour and die cut with, yet again… another Tasteful Labels die. I used dimensions on the sentiment label so it sat flush with the twine, adhered the completed panel to a Basic White card base and the cards were complete!
Simply use gold and Delicate Dahlias line art stamp

I just had to try gold embossing powder on Rich Razzleberry cardstock. This is a super simple card to make. This time my panel was gold cardstock cut at 4-⅛” wide by 5-⅜” tall. The Rich Razzleberry piece that is heat embossed with gold embossing powder, measures at 3-⅞” wide x 5-⅛” tall.
I also heat embossed with gold embossing powder the Sending Heartfelt Sympathy sentiment and used the same Tasteful Labels die that I used on the Two-Step Stampin’ Night of Navy card. After wrapping the awesome Simply Elegant Gold Trim around the panel three times and tying a bow, I glued everything down onto a Rich Razzelberry card base. For dark card bases like this card, remember to add a piece of white or light cardstock inside for the sender to write on.
Case the Catty bonus card!

I started this entire Delightful Dahlia crafting session with this card. It’s found in the Sale-A-Bration catalogue on pages 14 and 15. I figured the background paper was from the In Good Taste DSP pack, so I went with that and stamped all the line art stamps from the Delicate Dahlias set with Versamark and heat embossed with gold embossing powder.
The sentiment was stamped in the new In-Color Polished Pink and punched out from a circle punch. I had small samples of the new In-Color Vellum from a virtual crafty retreat I attended in the Spring. Again, the Simply Elegant Gold Trim was the perfect little extra something to add to the card.
Casing the Catty is a great way to get warmed up and start the creative process, especially if you are experiencing Creative Block and not sure what to do or how to get started. There is even a dedicated hashtag #casethecatty that is used on Instagram. CASE is an acronym for Copy And Share Everything or just Copy And Share. If you copy the card exactly and participate in the Share part, always give the original artist credit. It’s always nice to tag the artist too if you were inspired by something they did. It’s something that this community of crafters does that makes me enjoy it so much.
I’ll have some more projects to share with you next week. I haven’t made up my mind about which Sale-A-Bration item I want to feature next. If you are interested in getting your hands on the Delicate Dahlias stamp set, you can get it free with a $120 order from my online store or by contacting me. If you want to learn more about the Sale-A-Bration items or how this promotion works, visit my What is Sale-A-Bration and how do I get free items post.
Until the next one, Dawn
Creative Blend Newsletter
Stay inspired and subscribe to receive updates from the blog, upcoming card classes, events and crafty sales straight to your email.
Find me on social media
Stay connected with me online and see even more creative inspiration I’m sharing!